Since CK9 is asking for new strategies, I might as well add one.
Fractures - Six Player Land Rush Fractures is a pretty big map and you start with more stuff than you do on regular Land Rushes. Of course, knowing where to build is important, so I've made a rough guide of where you should and shouldn't build.
This guide assumes you are playing with High Resources.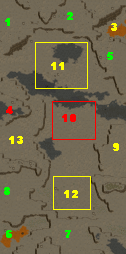
Green numbers indicate the best places to build.
Yellow number indicate decent places to build.
Red numbers indicate places you should never build.
1 - The upper left corner is easily defended, has plenty of room, and usually has good ore. Rare ore is usually close by, though if anybody builds at Site 2 you may have some trouble if you aren't allies.
2 - Not as big as Site 1, but easier to defend. I like to build my Tokamaks beyond the cliff to the right unless an enemy is in Site 3.
3 - The upper right corner is very small, though somewhat easy to defend. It's yellow beause you have to watch out from attacks from above which can be difficult to defend against.
4 - This place looks good, right? Easy to defend you'd think. I've never seen anybody live long when they build here. It's too small for anything more than a mining colony, and even if you defend your entrances enemies can still destroy you from below the cliffs. Avoid Site 4 at all costs.
5 - Just below the upper right corner, Site 5 is easy to defend and has plenty of building space. You might have to leave your base to find rare though.
6 - Site 6 is a nice little fort you can easily hole up in. It's big enough that you don't have to build near the cliffs (if you do, you'll probably get shot at). It usually has good ore, though you might have to go looking for rare. My personal favorite place to build.
7 - Right next to the fort, it's big, easy to defend, and has good ore (usually). Just watch out for the small entrance to the left - it's too small for any real army, but somebody could easily sneak a few Flares/Novas through it. Also be aware that you have two entrances on your right.
8 - Just north of the fort and connected to Site 7 by the previously mentioned small entrance. Big, but the ore isn't always that great. Fairly easy to defend, though.
9 - It's big, but doesn't always have the greatest ore. Also, it's close to the middle, which means you'll have to deal with people to the north and the south. Just be careful.
10 - The dead center of the map. With no natural defenses, you'll have enemies coming at you from every angle. Avoid the center.
11 - The northern middle is okay as long as you have allies to the north. You'll be the doormat if you build in this area, so get your allies to help defend you. If you're on your own, you probably shouldn't build here.
12 - See Site 11 description; replace "north" with "south".
13 - Just south of Site 4, this place is a bit small and can be difficult to defend. Yoou'll have to build defenses (and possibly look for more ore) in Site 4, so keep that in mind.
Edit:
Site X (not on map) - Arklon wants me to mention that the bottom right is the absolute worst place to build your base on the entire map. It's too small, the ore is pretty bad (rare is either incredibly vulnerable or far away), and the cliffs don't really offer you any protection. You can easily get rushed from three (four actually, since you have two entrances to your north) directions. I should note, however, that whoever builds at Site 7 should probably use this area as a bottleneck, though.
Okay, so now you know where to build. The next step is preparing yourself for battle. I'd recommend you start by building either a Nursery/University or Common Ore Smelter (personally, I'd go for the Smelter). Whichever you don't build, build when the first project is finished. Remember to research as you go (I won't tell you what to research. I have my own research path that may or may not work for you). Next, get an Advanced Lab. You're going to need to get a Tokamak soon, so get one when the Lab is finished. Idle your Vehicle Factory if you run out of power. Don't forget an Agridome (and Residences, if playing with Morale Unsteady). Get another Smelter(unless you don't have room for it near your mine) and Vehicle Factory (and remember, two Cargo Trucks per smelter). You should begin preparing for Rare Ore by getting a Miner and a few trucks. Hopefully you'll be able to have at least some powerful weaponry by the time the fighting starts. If you're forced to rely on Lasers/Microwaves/StickyFoam, you might want to consider building only one Rare Ore Smelter unless you have enough Common Ore to defend yourself and build up your colony. Get EMP as soon as you can, but don't waste all your ore on them. You'll still need ore for weapons that do damage (RPG, Rail, Thor's, etc.).As soon as you have a sizeable defense force of advanced weapons, send your weaker weapons to attack either the weakest opponent or the nearest threat (which could be your hostile neighbor or that army right outside your colony). If you've lasted this long, you should be able to get Tigers armed with the best weapons your colony can get. These Tigers should become your main defense force, while your Lynx should be used for offense. Why? Fractures is huge. Tigers will take far too long to reach your enemy. Use Lynx to try to sneak around your enemy's defenses (unless they still have Lynx [or Panthers if they were foolish enough to build them]).
Of course, this doesn't guarentee your victory. Always be on the lookout for units trying to sneak into your base, particularly Flares and Novas. You'll have to watch out for EMP Missiles, too (which is another reason to get Lynx instead of Tigers - you might be able to dodge the Missile with Lynx. Tigers have no chance).
This strategy relies on mining lots of ore early. This works especially well in rush games - hopefully your opponents were building Nurseries and Universites while you were getting that Common Ore Smelter.
I should probably go into more detail on attacking and defending. With many natural walls, defense on Fractures is not particularly difficult. Problem is, there are usually many entrances far away from each other. This means your forces are divided, and if an attentive opponent finds a weakness in your defenses, your colony is pretty much doomed. Example: You have 8 Tigers guarding one entrance: 3 EMP, 3 splash (Acid/ESG), 2 regular (most likely Thor's or RPG). Your opponent, realizing that you have 16 Tigers at your two other entrances, sends several EMP Lynx and a few Starflares at this entrance. Your Tigers destroy a few Lynx, but are inevitably disabled. The Flares rush past the disabled Tigers towards your Command Center. The other Tigers are too slow to save you, and your CC (or at the very least several vital structures) are destroyed. Depending on a combination of luck and skill, you may be able to rebuild and retaliate or you may be dead. Either way, you've learned that Tigers alone can't save you.
For offense, you'll probably have to rely on stealth and hit and run tactics. Like I said earlier, sneak some Flares into the enemy base. Turn your lights off. Or, if the cloak and dagger method doesn't suit you, (and this is really only for Eden), you can do a lot of damage with two or three Thor's if you have no intention to have them return. Disable their defenses and rush the Thor's past them. Navigate them carefully towards your target (most likely the enemy CC) and open fire. Make sure you don't shoot at anything before you get to your target or you'll have to deal with the painfully slow cooldown. If your Thor's Lynx are cornered and your enemy thinks they've stopped you, they're wrong. Move your Lynx right at your target, making sure they don't shoot at anything else. Hopefully the target will be near-death. As soon as the enemy is in firing range, self-destruct the Lynx. Hopefully, you'll take whatever it is you were shooting at with you.
Sometimes though, you'll just have to resort to brute force. If all else fails, throw everything you have at the enemy. Leave a few Lynx behind to defend your CC. Just make sure you have a spare CC, Structure Factory, Common/Rare Metals Storage, and power supply built in case somebody decides to Flare you.
Well, good luck out there. Things are drastically easier if there's an Attack Mark and a Build Mark.

